


Image Optimization Best Practices
One of the biggest contributors to slow website loading times is oversized images. Once you pick up good practices for image optimization, it’s easy to implement moving forward. Moving backward, however, can be a little time-consuming – especially if you’re dealing with a wide range of image sizes. Since images vary so much in terms of sizing and position on your WordPress site, it can be difficult to form a process around making sure each one is resized. Here’s what helps us.
Goal
Reduce all images currently in your media library to <100KB in size
Actionable Steps for Optimizing Images
1. Take a backup of your site! You’re going to be deleting images and replacing them, so if you forget what image goes where, it’s important to have a reference point to look to. You can use a staging site for this, or vice versa – if you’re working in staging, use production as your reference.
2. Use an image optimization plugin to take an initial first crunch of the images on your site quickly. We recommend Kraken for this. Kraken doesn’t bring ALL images to that sweet spot of <100KB in size, but it does bring quite a few there. As you’ll see in the next couple of steps, the less images you have resize manually, the better.
3. Next, you want to begin moving through your pages and looking for images that need to be resized. I say to look through pages as opposed to the media library because when you ultimately delete the oversized image to replace it with its newly optimized version, you want to be sure it doesn’t break the image in multiple places if it was used a few times.
Human error happens, and there will definitely be a handful of missing images regardless of how careful you may be – but moving through pages is simply the best way to be sure that margin for error is minimized. That, and proper testing.
4. When you find a page you want to edit, create a new folder on your desktop, and name it the page’s URL. (i.e. home, marketing library, etc.)
5. Head to the edit screen of the page. From top to bottom, begin downloading the images uploaded to the blocks on the page.
a. Hover over the image
b. Select the pencil (edit)
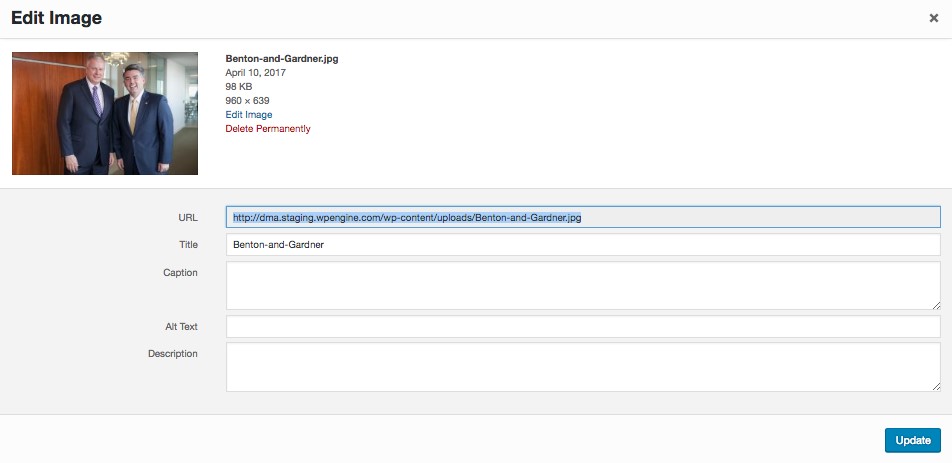
c. From the image data popup module, copy the image’s full path from the first field (highlighted below):
d. Take that link, and pop it in a new browser tab. From the browser window, download the image to the new page folder you just created.
e. Repeat for all of the images on the page.
6. Once you’re all done moving through the page’s media, open up your new folder in Photoshop.
7. For each image, use CMD-ALT-SHIFT-S to open up the ‘Save image for web’ screen. Select ‘4-Up’ at the top of the screen. This shows you four versions of your image with varying sizes (size info is on the bottom left of each square):
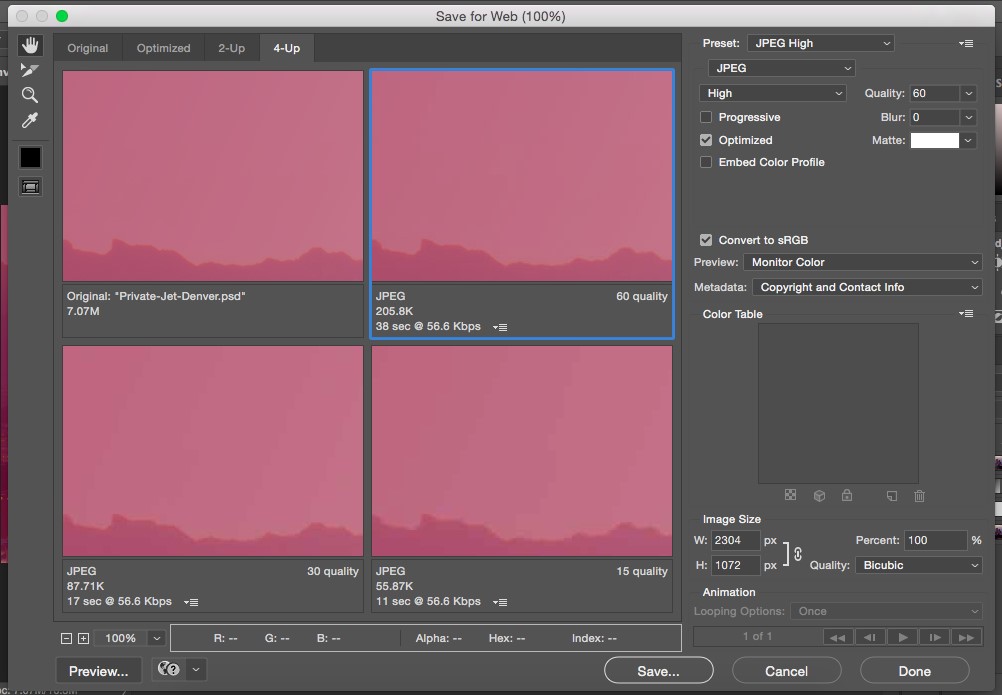
8. Look through these images and find the one that’s <100KB, and select it. Not seeing one less than that size? Use the quality slider:
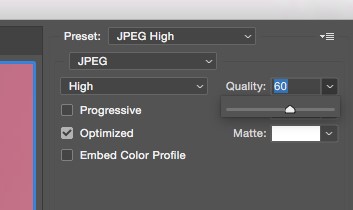
9. Be warned that doing this sacrifices image quality for compression, so your image won’t be as crisp the lower you go. Play around with the quality slider until you get an image that’s as close to 100KB as possible, without going over.
10. Save it to your new folder, which will effectively replace the old image. Repeat for as many images as you have. (To expedite this process, look into Photoshop Actions. I’d go further on this but that requires a whole blog article unto itself, and I’m sure plenty have written about it. Basically, actions allow you to repeat a process on as many images as you’d like in an automated way. Only caveat here is that the images need to be similar in size.)
11. Now head back to your WordPress site. It’s time to replace the oversized images with the smaller ones, being sure to delete the larger images.
a. Open the media library in a new tab. Upload the folder with your optimized images to your media library.
b. Back on the Page edit screen, move to image number one. Open up the image data module again using the pencil icon.
c. Grab the image’s file name – this is everything AFTER /uploads/ (highlighted below)
d. 
e. In the other tab with the media library open, paste that file name in the search box.
f. When the image comes up, hit ‘Delete Permanently.’
g. Head back to your page edit screen. Hover over the image, and hit the red ‘X’ next to the pencil icon.
h. Upload your newly optimized image in its place.
Optimized Images Improve User Experience
Don’t forget to delete the memory-hoggers! Otherwise, this exercise is futile. The goal is to clear up as much server space as possible. Whew! That’s a lot. It may seem daunting, but the increase in site speed, better Google rankings, and improved user experience that comes from optimizing images makes this process well worth it for you and your viewers. Often it’s very case-by-case, and involves a certain level of judgment calls, but once you get the hang of it, it becomes second nature.
And remember – properly sizing images is only one step in the image optimization process! We’ll get into the other fun stuff like file names and alt tags in blogs to come.
As always, reach out to our team at BNP Engage when you want to ensure that all your optimization needs are met.